The Story Behind This Recipe
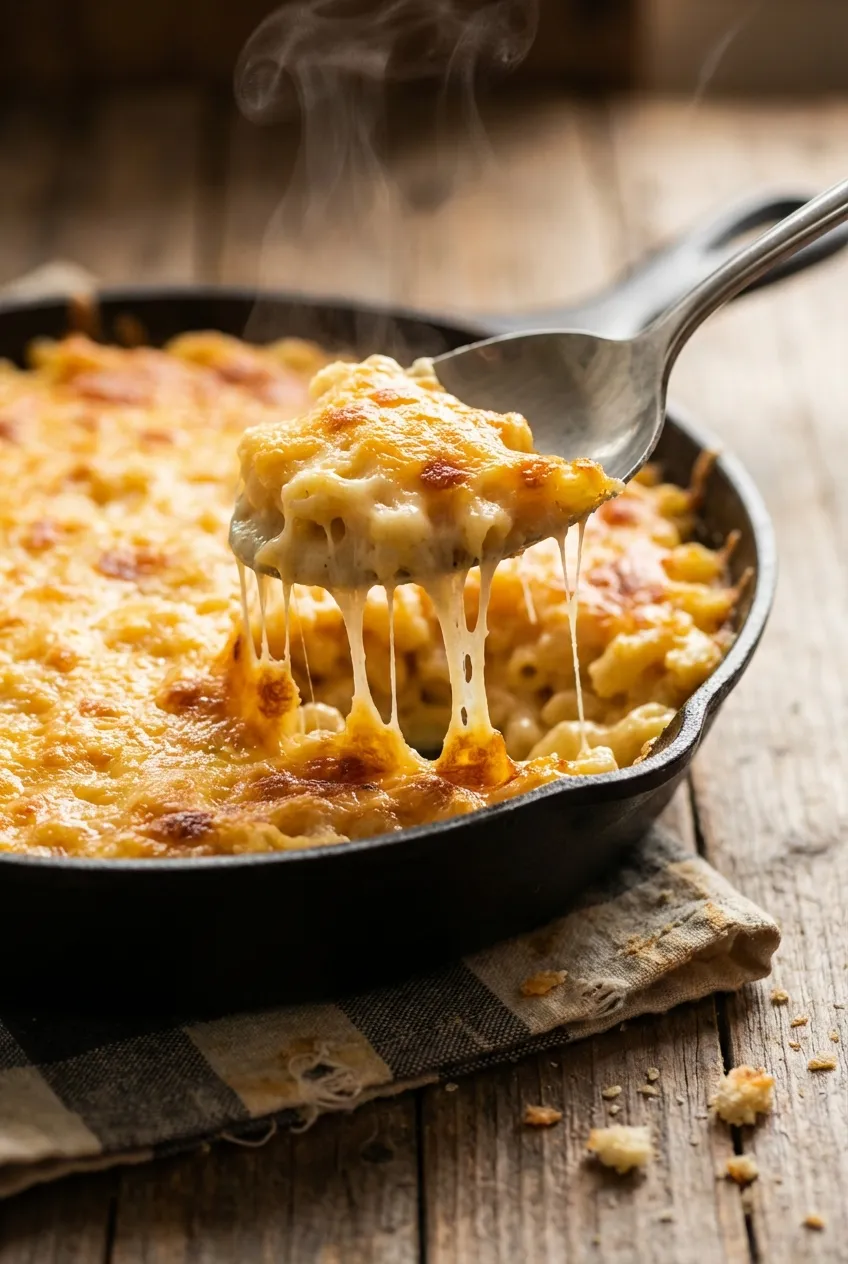
If there is one dish that carries the weight of every holiday, every family reunion, and every Sunday supper in my family, it is mac and cheese. Not the box kind — not even close. I am talking about the kind my grandmother Ruby made in a deep aluminum pan that she’d been using since before I was born, the kind that came out of the oven with a golden-brown crust so beautiful you almost didn’t want to cut into it. Almost. Because once you did, and that first scoop pulled away with long strings of melted cheese stretching between the spoon and the pan, nobody had the willpower to wait another second. Grandma Ruby’s mac and cheese was the centerpiece of every table in our Memphis home, and there was never — not once — any left over.
She never wrote the recipe down. She measured by feel, by the color of the cheese sauce, by the way the custard looked when she poured it over the noodles. I spent years standing next to her in the kitchen, watching her hands work, trying to memorize every pinch and pour. When she passed, I was terrified I’d lost it. But the muscle memory was there. The first time I made it on my own — standing in my smokehouse kitchen at five in the morning before a competition day — I cracked those eggs into the milk and my hands just knew. It wasn’t perfect that first time. It took another fifty batches before I got it right. But when I finally pulled a pan from the oven and tasted that exact same flavor from my childhood — creamy, sharp, with that slight tang from the sour cream she always snuck in — I sat down on a milk crate and just about cried.
Today, this mac and cheese is the single most requested side dish at Williams’ Smokehouse. People order brisket and ribs, sure, but they come back for the mac and cheese. I’ve had customers drive three hours for a pan of it. Every time I make it, I think about Grandma Ruby standing at her stove, her apron dusted with flour, telling me the secret to good mac and cheese is simple: “Don’t be stingy with the cheese, baby, and put some love in it.” I have never once been stingy, and I have never once skipped the love.
Before You Start
- Grate your own cheese. Pre-shredded cheese from the bag is coated with anti-caking agents like cellulose and potato starch that prevent it from melting smoothly. Take the extra ten minutes to grate blocks of cheese by hand — the difference in melt and creaminess is night and day.
- Bring your dairy to room temperature. Cold eggs and cold milk will shock the cheese sauce and can cause it to seize up or become grainy. Pull the eggs, milk, evaporated milk, sour cream, and cream cheese out of the fridge at least 30 minutes before you start cooking.
- Undercook the pasta slightly. You want the elbows al dente — even a shade past firm — because they will continue to absorb moisture and cook further in the oven. Overcooked pasta turns to mush in the baking dish.
- Reserve your pasta water. That starchy cooking water is liquid gold. It helps bind the cheese sauce together and gives the custard a silky texture that plain milk alone cannot achieve.
- Use a 9x13-inch baking dish, not a deeper pan. The proportions matter. A 9x13 dish gives you the ideal ratio of creamy interior to golden crust. A deeper pan means the center stays wet and the top doesn’t brown properly.
Instructions
Step 1: Cook the Pasta
Bring a large pot of generously salted water to a rolling boil over high heat. Add 1 pound of elbow macaroni and cook for 6 to 7 minutes — about 2 minutes less than the package directions. You want the pasta firm to the bite, slightly underdone in the very center. It will finish cooking in the oven.
Before draining, scoop out 1 cup of the starchy pasta water and set it aside. Drain the macaroni and return it to the pot. Toss with 1 tablespoon of butter to prevent sticking. Set aside.
Step 2: Prepare the Cheese Blend
While the pasta cooks, combine the freshly grated sharp cheddar, extra-sharp cheddar, Colby Jack, and Monterey Jack in a large bowl. Toss them together so the varieties are evenly mixed. Set aside 1 cup of the mixed cheese — this will be your topping for the golden crust.
Step 3: Make the Custard Base
In a separate large mixing bowl, whisk together the 3 beaten eggs, evaporated milk, whole milk, sour cream, garlic powder, dry mustard powder, cayenne pepper, smoked paprika, salt, and black pepper. Whisk vigorously until everything is completely smooth and the sour cream is fully incorporated with no lumps remaining.
Step 4: Build the Mac and Cheese
Preheat your oven to 350°F (175°C). Grease a 9x13-inch baking dish with butter.
Melt the remaining 3 tablespoons of butter in a small saucepan over low heat, or microwave for about 30 seconds. Cut the cream cheese into small cubes so it melts evenly.
In the pot with the drained macaroni, add the melted butter, cubed cream cheese, and three-quarters of the cheese blend (reserving that 1 cup for topping). Pour in the custard mixture and the reserved pasta water. Fold everything together with a large spatula or wooden spoon until the cheese begins to melt into the pasta and the custard coats every elbow evenly. The mixture will look quite loose and wet — that is exactly what you want. The pasta will absorb the liquid as it bakes.
Pour the mixture into the prepared baking dish and spread it into an even layer. Scatter the reserved 1 cup of cheese evenly over the top.
Step 5: Bake Until Golden and Bubbly
Place the baking dish on the center rack of the oven and bake at 350°F (175°C) for 35 to 40 minutes. You are looking for several signs of doneness: the edges should be bubbling vigorously, the top should be golden brown with darker spots where the cheese has caramelized, and the center should be set — it can have a very slight jiggle but should not look liquid. If the top is not as browned as you’d like after 40 minutes, switch the oven to broil on high and broil for 2 to 3 minutes, watching constantly. The cheese can go from golden to burnt in seconds under a broiler.
Step 6: Rest and Serve
Remove the mac and cheese from the oven and let it rest on a wire rack for 10 to 15 minutes. This resting time is critical — it allows the custard to set up fully and makes the difference between a mac and cheese that holds its shape on the plate and one that runs everywhere like soup. The internal temperature should be around 165°F (74°C) when fully set.
Garnish with a light dusting of smoked paprika and freshly chopped chives. Serve generous scoops with a large spoon, making sure to get some of that golden crust in every portion.
Ingredient Substitutions
| Ingredient | Substitute | Notes |
|---|---|---|
| Extra-sharp cheddar | Gruyere or aged Gouda | Gruyere adds a nutty depth. Aged Gouda brings caramel notes. Both melt beautifully but change the flavor profile from traditional Southern. |
| Colby Jack | Mild cheddar or Havarti | Colby Jack provides a creamy, mild melt. Havarti is an excellent stand-in with a buttery flavor. |
| Monterey Jack | Fontina or Muenster | Both are excellent melters that add creaminess without competing with the sharper cheeses. |
| Evaporated milk | Heavy cream mixed 50/50 with whole milk | Evaporated milk gives a specific richness and slight sweetness. Heavy cream works but makes the dish heavier. |
| Sour cream | Full-fat Greek yogurt | Provides the same tang and creaminess. Do not use low-fat — you need the fat content for texture. |
| Elbow macaroni | Cavatappi, shells, or penne rigate | Any short pasta with ridges or curves that can trap the cheese sauce will work. Avoid long or flat pasta. |
| Cream cheese | Mascarpone | Mascarpone is milder and slightly sweeter but melts just as smoothly into the sauce. |
| Eggs | Omit for a looser, saucier mac | The eggs create the custard-style structure. Without them, you get a creamier but less structured bake. Reduce baking time by 5 minutes. |
Chef’s Tips
- The cheese ratio is everything. You need a balance of sharp cheeses for flavor and mild, creamy cheeses for melt. If you go all sharp cheddar, the sauce can separate and become greasy. If you go all mild, it tastes flat. The four-cheese blend I use here — sharp cheddar, extra-sharp cheddar, Colby Jack, and Monterey Jack — gives you bold flavor with a smooth, velvety texture that holds together.
- Don’t skip the eggs. This is what makes it Southern baked mac and cheese instead of stovetop mac and cheese. The eggs create a custard that sets in the oven, giving you that dense, scoopable structure where you can cut clean squares that hold their shape. Without the eggs, you just have pasta in cheese sauce — good, but not the same.
- Low and slow on the oven temperature. I know it’s tempting to crank the oven to 400°F to speed things up. Don’t do it. At 350°F (175°C), the custard sets gently and evenly. Higher temperatures cause the eggs to curdle and the cheese to break, and you end up with a greasy, separated mess with a rubbery texture.
- Let it rest — seriously. I cannot stress this enough. Pulling it out of the oven and diving in immediately will give you a soupy plate. Those 10 to 15 minutes of resting time let the custard finish setting and the cheese sauce thicken up. Patience pays off with clean, beautiful scoops.
- Use smoked paprika, not regular. Smoked paprika adds a subtle warmth and depth that echoes the smokiness of a Southern kitchen. Regular paprika is mostly just color. The smoked variety brings actual flavor, and it pairs perfectly with the sharp cheddar.
- The starchy pasta water trick. That cup of reserved cooking water contains starches released from the pasta that act as a natural emulsifier. It helps the cheese melt smoothly into the custard instead of clumping. My grandmother did this instinctively — she just called it “noodle water” — and it took me years to understand the science behind why it worked.
Meal Prep & Storage
- Refrigerator storage: Cover tightly with plastic wrap or transfer to an airtight container. Keeps well for 4 to 5 days in the fridge. The flavor actually deepens overnight as the cheese and spices meld together.
- Reheating: Reheat individual portions in the microwave for 90 seconds to 2 minutes, adding a splash of milk to restore creaminess. For the whole dish, cover with foil and reheat in a 325°F (165°C) oven for 20 to 25 minutes until warmed through.
- Freezing: Wrap the baking dish tightly in plastic wrap and then aluminum foil, or transfer portions to freezer-safe containers. Freezes well for up to 3 months. Thaw overnight in the refrigerator before reheating.
- Make-ahead assembly: You can assemble the entire dish up to 24 hours in advance — pour the mac and cheese into the baking dish, cover with plastic wrap, and refrigerate. When ready to bake, remove from the fridge 30 minutes before baking to take the chill off, then add 5 to 10 extra minutes to the baking time.
- Batch cooking: This recipe doubles perfectly for large gatherings. Use two 9x13 dishes rather than one oversized pan to maintain the proper crust-to-interior ratio.
Pairing Suggestions
- Protein: Slow-smoked pulled pork, BBQ brisket, or fried chicken. The rich, creamy mac and cheese is the quintessential side dish for any Southern-style meat. At my smokehouse, the most popular plate is a quarter pound of pulled pork with a generous scoop of this mac and cheese.
- Greens: Braised collard greens with smoked turkey necks or a simple sauteed kale with garlic and red pepper flakes. The bitterness and acidity of the greens cut through the richness of the cheese beautifully.
- Bread: Buttermilk cornbread or warm skillet cornbread with honey butter. The sweetness of the cornbread plays against the savory, sharp cheese in the mac.
- Beverage: A crisp, cold sweet tea is the classic Southern pairing. For something stronger, an off-dry Riesling or a light amber ale balances the richness without overpowering it.
Frequently Asked Questions
Why is my mac and cheese grainy or gritty? This almost always comes down to the cheese. Pre-shredded cheese from bags contains anti-caking agents that prevent smooth melting. Always grate your cheese from blocks. The other culprit is too-high heat — if the oven is above 375°F (190°C), the proteins in the cheese can tighten up and release fat, leaving behind a grainy, broken sauce. Stick to 350°F (175°C) and let it bake gently.
Can I make this without eggs? You can, but it will be a different dish. Without eggs, you get a creamier, saucier, stovetop-style mac and cheese that happens to be baked. The eggs are what create the custard structure that defines Southern-style baked mac and cheese — that dense, sliceable texture that holds its shape on the plate. If you skip the eggs, reduce baking time by about 5 minutes and expect a looser result.
What’s the best pasta shape for baked mac and cheese? Elbow macaroni is traditional and what my grandmother always used, but cavatappi (corkscrew-shaped pasta) is my personal favorite upgrade. The spirals trap more cheese sauce in their curves and ridges, giving you an even cheesier bite. Shells and penne rigate also work beautifully. Avoid smooth pasta like ziti or spaghetti — the sauce slides right off.
My top isn’t browning. What should I do? If the mac and cheese is cooked through (edges bubbling, center set) but the top is still pale after 40 minutes, switch to the broiler on high for 2 to 3 minutes. Position the dish on the upper-middle rack, about 6 inches from the heating element, and watch it like a hawk. Broilers are unpredictable and cheese goes from golden to charred in about 30 seconds.
Can I add mix-ins like bacon or jalapenos? Absolutely, but be thoughtful about it. Crumbled cooked bacon, diced roasted green chiles, caramelized onions, or sauteed andouille sausage all work well. Fold them into the pasta mixture before pouring it into the baking dish. Just be careful with ingredients that release a lot of moisture (like raw tomatoes or fresh peppers) — they can throw off the custard ratio and make the center soggy. Pre-cook any wet ingredients first.
How do I know when it’s done baking? Look for three things: the edges should be actively bubbling, the top should be golden brown with some darker caramelized spots, and the center should be set with only the slightest jiggle when you shake the pan gently. If the center still looks liquid, give it another 5 minutes. An instant-read thermometer inserted into the center should read at least 160°F (71°C) — the residual heat during resting will bring it up to 165°F (74°C).