The Story Behind This Recipe
Growing up in my family’s restaurant in San Francisco’s Chinatown, I had a complicated relationship with orange chicken. It wasn’t something we served — my father dismissed it as “mall food,” a bastardization of Cantonese cooking invented to please American palates. And he wasn’t entirely wrong. The orange chicken most people know bears almost no resemblance to the delicate dried tangerine peel dishes of Guangdong province. But here’s the thing my father never admitted: when done well, with real technique behind it, orange chicken is genuinely delicious. The American version just needed someone who understood both sides of the equation.
During my years at the Culinary Institute of America at Hyde Park and later staging at Narisawa in Tokyo, I learned that great cooking is never about authenticity for its own sake — it’s about understanding the principles behind a dish and executing them with precision. The crispiest fried chicken comes from a carefully balanced cornstarch batter, double-fried at specific temperatures. The best orange sauce starts with real citrus juice and zest, not artificial concentrate. When I was Executive Chef at Jade Garden in San Francisco, I finally put my version on the menu as a special. It sold out in forty minutes. My father tried it, said nothing for a long moment, then asked for seconds. That was his highest compliment.
This recipe is the bridge between those two worlds. The frying technique comes straight from Cantonese tradition — the same method my uncle used for salt-and-pepper squid. The sauce pulls from both the dried tangerine peel flavors of authentic Cantonese cooking and the sticky-sweet glaze Americans love. It’s quick, it’s easy, and it tastes like the best version of something you already know. No apologies necessary.
Before You Start
- Cut the chicken evenly. Every piece should be roughly 1 inch. Uneven sizes mean some pieces overcook while others stay undercooked. Thighs are non-negotiable here — breast meat dries out too fast during frying.
- Make the sauce first. Once you start frying, you need to move fast. Having the sauce simmered, thickened, and waiting means you can toss the hot chicken immediately and get that perfect glossy coat.
- Bring your oil to temperature before battering. Cornstarch batters degrade quickly once mixed. If you batter the chicken and then wait for oil to heat, the coating gets gummy and won’t crisp properly.
- Set up a wire rack over a sheet pan. You need somewhere to rest the chicken between the first and second fry. Paper towels trap steam and make the bottom soggy — a wire rack keeps air circulating on all sides.
- Open a window or turn on the vent hood. Deep frying fills a kitchen with oil mist fast. Good ventilation keeps your smoke detector quiet and your kitchen cleaner.
Instructions
Step 1: Make the Orange Sauce
Combine the orange juice, soy sauce, rice vinegar, honey, brown sugar, sesame oil, garlic, ginger, red pepper flakes, and orange zest in a medium saucepan over medium heat (around 325F / 165C). Stir to dissolve the sugar and bring to a gentle simmer. Cook for 3-4 minutes until the raw garlic smell mellows and the sauce smells fragrant and citrusy.
Give the cornstarch slurry a quick stir (it settles fast) and pour it into the simmering sauce while whisking constantly. The sauce will thicken within 30-45 seconds — it should coat the back of a spoon and leave a clear trail when you drag your finger through it. Remove from heat and set aside. It will continue to thicken slightly as it cools.
Step 2: Prepare the Chicken and Batter
Pat the chicken pieces thoroughly dry with paper towels. Season with kosher salt and white pepper and toss to distribute evenly.
In a large bowl, whisk together the cornstarch, flour, and baking powder. In a separate bowl, beat the eggs. Working in batches, dip the chicken pieces into the beaten egg, let the excess drip off for 2-3 seconds, then toss in the cornstarch mixture until every surface is completely coated. The coating should feel dry and slightly powdery to the touch. Place the battered pieces on a wire rack in a single layer — do not let them touch or they will stick together.
Step 3: First Fry — Build the Crust
Pour the oil into a large, heavy-bottomed pot or Dutch oven (the oil should be at least 2 inches deep). Heat to 325F (165C) — use a deep-fry thermometer or instant-read thermometer to check. If you don’t have a thermometer, drop a small pinch of batter into the oil: it should sink briefly, then float to the surface with steady, moderate bubbling.
Fry the chicken in 3-4 batches of 8-10 pieces each. Do not crowd the pot — overcrowding drops the oil temperature and causes steaming instead of frying. Fry each batch for 3-4 minutes, turning the pieces occasionally with a spider strainer or slotted spoon, until the coating is set and pale golden. The chicken won’t be deeply brown yet — that’s intentional. Transfer to the wire rack and let rest for 5 minutes while you fry the remaining batches. This resting period allows the internal moisture to redistribute and the coating to dry out, which is the secret to a shatteringly crispy second fry.
Step 4: Second Fry — Lock in the Crunch
Increase the oil temperature to 375F (190C). This higher temperature is what transforms the pale first-fry coating into a deep golden, crackly shell. Working in the same batches, fry the chicken a second time for 2-3 minutes per batch. The pieces should turn a rich, dark golden brown and the bubbling will become more aggressive as the last traces of surface moisture evaporate. Listen for the sound — it shifts from a heavy, wet sizzle to a lighter, sharper crackle when the chicken is perfectly crispy.
Transfer to a clean wire rack. The coating should feel hard and crunchy to the touch, not at all yielding.
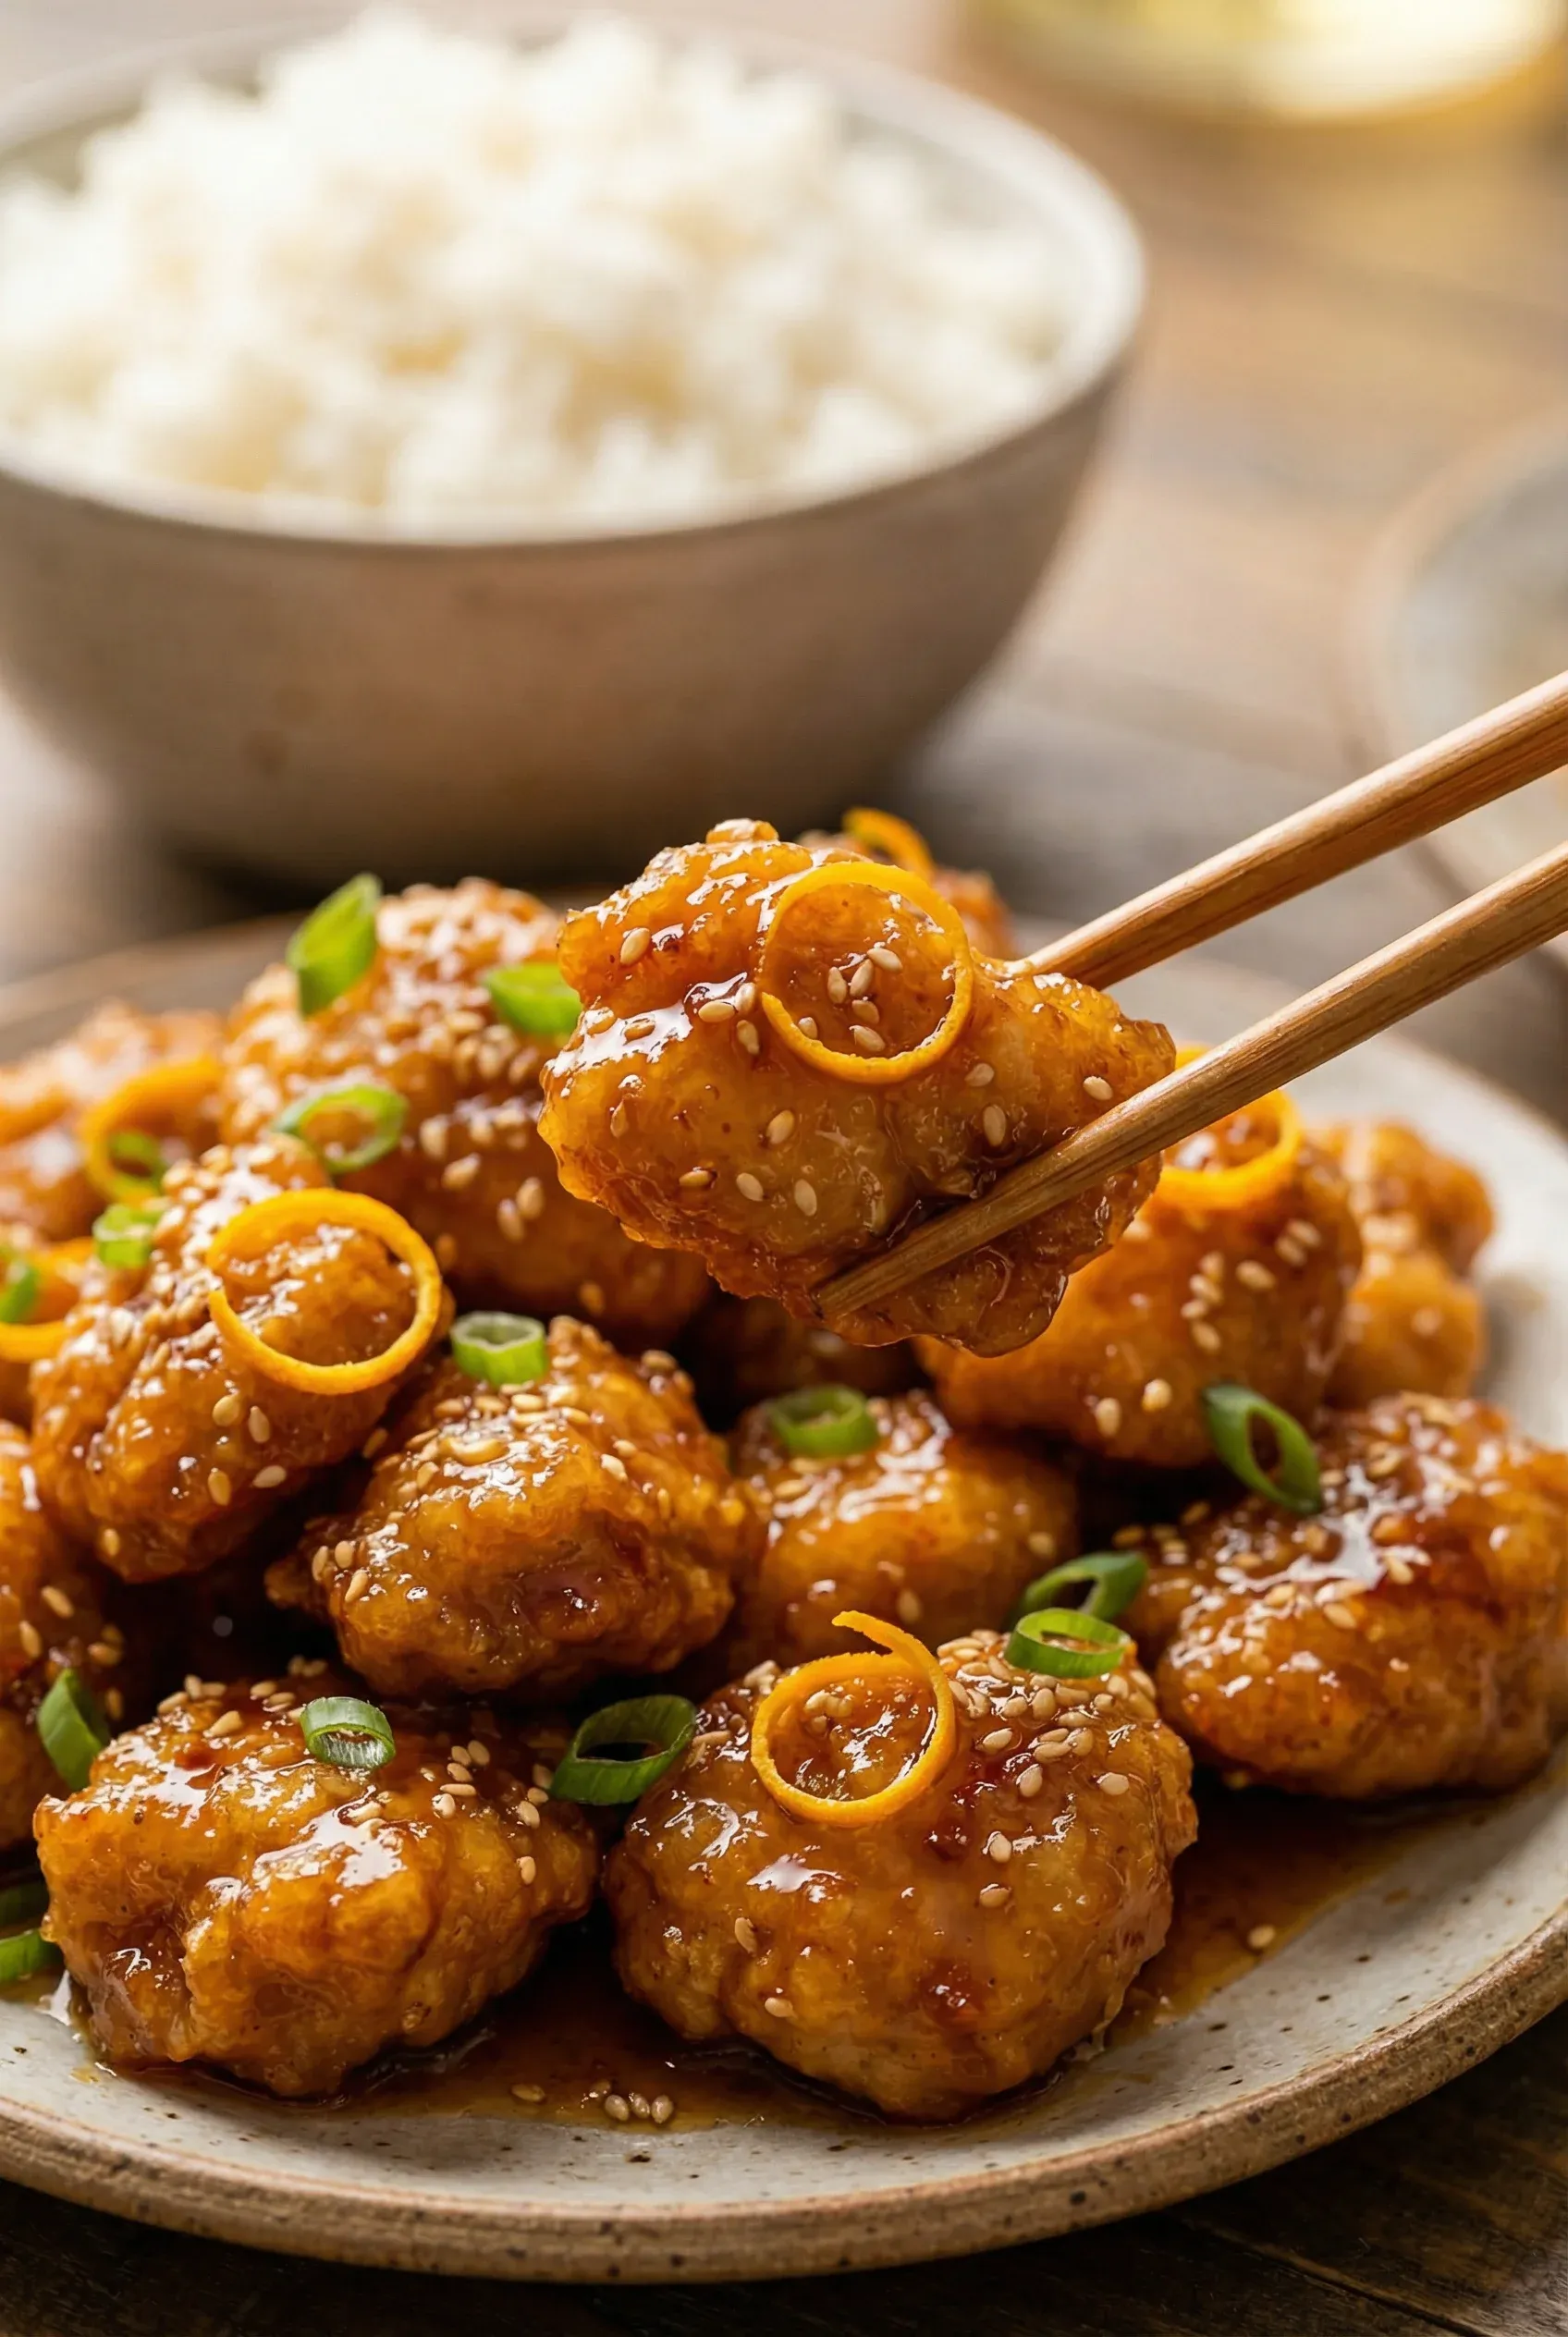
Step 5: Toss and Serve
Reheat the orange sauce over medium-low heat for 1 minute until it loosens and becomes pourable again — you want it warm but not boiling, or it will make the chicken soggy before you can serve it.
Transfer all the freshly fried chicken to a large mixing bowl. Pour the warm orange sauce over the chicken and toss immediately using tongs or two large spoons. Work quickly and coat every piece evenly. The sauce should cling to the craggy surface of the coating in a thin, glossy layer.
Transfer to a serving bowl or platter. Garnish with toasted sesame seeds, sliced green onions, and orange zest curls. Serve immediately alongside steamed jasmine rice. Do not let the chicken sit — the coating starts absorbing sauce after about 8-10 minutes and loses its crunch.
Ingredient Substitutions
| Ingredient | Substitute | Notes |
|---|---|---|
| Chicken thighs | Chicken breast or extra-firm tofu | Breast dries out faster — reduce second fry to 90 seconds. Press tofu for 30 minutes before cubing. |
| Cornstarch | Potato starch or tapioca starch | Potato starch creates an even crispier coating. Tapioca starch gives a chewier, more mochi-like texture. |
| Fresh orange juice | Mandarin juice or tangerine juice | Mandarins are sweeter — reduce honey by 1 tablespoon. Tangerine is the most authentic Cantonese choice. |
| Honey | Maple syrup or agave nectar | Maple adds earthier notes. Agave is thinner — use 2 tablespoons instead of 3. |
| Soy sauce | Tamari or coconut aminos | Tamari for gluten-free. Coconut aminos are milder — add an extra tablespoon. |
| Rice vinegar | Apple cider vinegar or white wine vinegar | Slightly sharper. Use the same amount but taste the sauce before thickening. |
| Brown sugar | Coconut sugar or raw turbinado | Coconut sugar adds a subtle caramel depth that works beautifully here. |
| Red pepper flakes | Gochugaru or 1 teaspoon sambal oelek | Gochugaru gives a fruity, smoky heat. Sambal adds garlic notes and more body. |
Chef’s Tips
- Double frying is the whole game. The first fry at 325F sets the coating and partially cooks the chicken. The second fry at 375F drives out remaining moisture and creates that shatteringly crisp shell that holds up under the sauce. Skipping the double fry gives you good chicken. Doing both gives you extraordinary chicken.
- Use thighs, not breasts. Thigh meat has more fat and connective tissue, which means it stays juicy even after two rounds of frying. Breast meat turns chalky and dry. This is the single biggest difference between mediocre and outstanding orange chicken.
- Zest before you juice. Always zest your oranges before cutting and juicing them. Trying to zest a halved, juiced orange is slippery and frustrating. Use a Microplane and get only the bright orange outer layer — the white pith underneath is bitter.
- Control your oil temperature religiously. Oil that’s too cool produces greasy, heavy chicken. Oil that’s too hot burns the outside before the inside cooks through. A thermometer costs ten dollars and is the difference between fried food that’s delicious and fried food that’s a disappointment.
- Toss, don’t drown. The sauce should lightly coat each piece, not pool at the bottom of the bowl. If you made the sauce too thin, return it to the stove and reduce it for another minute before tossing. You want a glossy lacquer, not a soup.
- Fry in small batches. I know it’s tedious, but adding too many pieces at once drops the oil temperature by 50-75 degrees and turns frying into steaming. Three to four batches for two pounds of chicken is the right pace.
Meal Prep & Storage
- Storage: Refrigerate leftover chicken and sauce separately in airtight containers for up to 3 days. Keeping them apart prevents the coating from turning completely soft.
- Reheating: Spread the chicken on a wire rack set over a sheet pan and reheat in a 400F (200C) oven for 8-10 minutes until the coating re-crisps and the chicken is heated through. Warm the sauce in a small pot and toss just before serving. Do not microwave — it turns the coating rubbery.
- Freezing: Freeze the fried chicken (without sauce) in a single layer on a sheet pan until solid, then transfer to a freezer bag for up to 2 months. Reheat from frozen at 425F (220C) for 12-15 minutes. Freeze the sauce separately in a jar with a half-inch of headspace.
- Batch prep the sauce: The orange sauce can be made up to 5 days ahead and refrigerated. It actually improves as the ginger and garlic flavors meld. Reheat gently before using.
Pairing Suggestions
- Rice: Steamed jasmine rice is the classic move, but try coconut rice for a richer pairing. Cook jasmine rice with half coconut milk and half water for a subtle tropical sweetness that plays beautifully against the citrus glaze.
- Vegetables: Stir-fried broccoli with garlic, a simple bok choy sauteed with oyster sauce, or a raw Asian slaw of shredded cabbage, carrot, and cilantro dressed with rice vinegar and sesame oil.
- Drink: A cold Tsingtao or Sapporo lager cuts through the richness perfectly. For non-alcoholic, try iced jasmine tea or sparkling water with a squeeze of fresh orange.
- Soup starter: A small bowl of egg drop soup or hot and sour soup before the main course turns this into a complete Chinese dinner that feels like a special occasion.
Frequently Asked Questions
Can I bake this instead of frying? You can, but the texture will be different. Spray battered chicken pieces generously with cooking spray and bake at 425F (220C) on a wire rack for 20-25 minutes, flipping halfway through. You’ll get a reasonably crispy coating, but it won’t have the same shatteringly crunchy shell that double-frying produces. If you go this route, broil for the last 2 minutes to deepen the color.
Why do I need to fry the chicken twice? The first fry at a lower temperature cooks the chicken through and sets the starch coating. The resting period between fries allows surface moisture to migrate outward. The second fry at a higher temperature then blasts that moisture away and creates a rigid, glass-like crust. It’s the same technique behind the crispiest Korean fried chicken and many traditional Cantonese preparations. One fry gives you crispy. Two fries give you crispy that stays crispy.
My sauce is too thin. What went wrong? Most likely the cornstarch slurry wasn’t mixed well enough before adding (it settles within seconds), or the sauce wasn’t at a full simmer when you added it. Return the sauce to medium heat and bring it back to a simmer. Mix another teaspoon of cornstarch with a tablespoon of cold water and stir it in. It will thicken within 30 seconds. Remember that the sauce also thickens as it cools, so aim for slightly thinner than your target consistency while it’s hot.
Can I use an air fryer? Yes — coat the chicken the same way, spray liberally with oil, and air fry at 375F (190C) for 10-12 minutes, shaking the basket halfway through. The coating won’t be as uniformly crispy as deep-fried, but it’s a solid weeknight compromise. Work in smaller batches than you think — overcrowding an air fryer basket leads to steamed, not fried, chicken.
How do I dispose of the frying oil? Let the oil cool completely to room temperature — never pour hot oil down the drain. If the oil still looks clean and doesn’t smell off, strain it through a fine-mesh sieve lined with cheesecloth into a jar and reuse it once or twice for future frying. Otherwise, pour cooled oil into its original container or a sealed disposable container and place it in the trash.
What makes this different from Panda Express orange chicken? Fresh citrus versus concentrate, real aromatics versus artificial flavoring, and a double-fry technique versus a single pass through the fryer. Panda Express uses a pre-mixed sauce base and a single fry on a commercial line optimized for speed. This recipe uses freshly squeezed orange juice, hand-grated ginger, real garlic, and a double-fry method that produces a noticeably crispier, lighter coating. The difference is immediately obvious in both texture and taste.